Saturday, March 24, 2012

Companion Planting and Flowers

This week we planted our second batch of seeds.  These included tomatoes (brandywine, whopper, and supersweet), bell peppers, chile de arbol peppers, jalapenos, Brussels sprouts, cabbage, broccoli, and cauliflower.  We also started rosemary, parsley, and thyme.  The seeds we started a couple weeks ago are doing well; they are shown in the picture to the right.  The larger seedling in the lower-right corner is cilantro.  Most of the other seedlings are leeks.  Only on celery has sprouted so far (to the right of the cilantro), but it has only been 13 days and the germination time for celery is 7–21 days, so I'm not worried yet!

 While we are waiting for the seedlings to graduate to peat pots and lights (and grow very large), I want to spend a few weeks talking about several general gardening topics.  The first topic I want to cover is companion planting, specifically companion flowers.  We have spent a lot of time researching companion planting.  The reason for this is that most pests can be dealt with without using pesticides, by simply intelligently planning your garden and adding certain plants to target certain species of pests.  Other plants can be used to attract pollinators (like bees) and predators (like ladybugs).

Our primary reference for companion planting is Carrots Love Tomatoes by Louise Riotte.  This book is in the Amazon app to the right of the blog.  It has great information on which plants to plant together and which plants to keep far apart.  For tomatoes, for instance, it tells you that they should not be planted near any member of the cabbage family or potatoes, that they will protect asparagus from the asparagus beetle, that garlic will protect them from the red spider mite, and that they should only be watered from beneath.  Another important fact regards bush beans.  Bush beans (including butter, green, snap, string, and wax beans) do well with cucumbers, celery, and strawberries, but do not do well with onions.  The book also has sections on herbs, wild plants, soil improvement, poisonous plants, and garden planning.

One new type of companion planting we are doing this year involves flowers.  The are basically four types of companion flowers:  those that attract pollinators, those that attract predators, those that repel pests, and those that attract pests.  I will talk about each of these below.
Sunflowers Sweet peas Zinnias
First is the group of flowers that attract pollinators.  Pollinators are primarily honey bees, so these flowers have a lot of nectar and scent.  Most of them also serve well as cut flowers.  These flowers include sunflowers, sweet peas, cosmos, zinnias, and mints.  We are going to plant sunflowers near the corn to attract bees to the cucumbers, squash, and melons.  We will also plant sweet peas and zinnias in pots set in the garden paths.  We were already planting mint, so that will help as well.

Marigolds
Second are the flowers that attract pest predators like ladybugs, which eat aphids.  The herbs parsley, dill, and cilantro, all of which we will grow, do this, as do sunflowers, marigolds, chrysanthemums, calendulas, zinnias, and sunflowers.  We will grow marigolds in pots as well.

Next are the flowers that repel pests.  There are no flowers that repel all pests, but catmint is one of the best at repelling aphids, potato beetles, and squash bugs. We will plant catmint near the potatoes and squash.  Catmint (nepeta mussinii) is in the same genus as catnip (nepeta cataria), but is a different species; all members of the genus nepeta affect cats though. We will plant borage amongst the tomatoes, because they repel tomato hornworms (they also make a good herbal tea!).  Finally, geraniums repel Japanese beetles, which plagued our cucumbers and beans last year, so we will plant these are well.  Sage, which we already plant as an herb, repels cabbage moths and carrot rust flies, so we will place the sage pots near the cabbages.
Catmint Geranium Borage
Finally are the flowers that attract pests.  This sounds kind of strange, but if you can lure the pests away from the garden, the combination of these attractors and the repellents is hard to beat!  Four o'clocks bloom in the late afternoon and lure Japanese beetles.  Once they are lured, you can collect them in jars of soapy warm water, which kills them instantly.  Nicotiana attracts several types of insects, and nasturtiums are irresistible to aphids.  We will be planting four o'clocks and nasturtiums in our "flower garden" to lure these pests.
"Broken colors" four o'clocks "Princess of India" nasturtiums
That's all for this week's topic.  Next week I will talk about composting!

Saturday, March 17, 2012

Garden Plan 2012

The seeds we planted last week have yet to sprout.  The germination time range from 7 to 21 days, so we don't really expect any action for another week or so.  However, I had planned on posting weekly pictures of the growing seedlings, so the first week's picture is to the left.


The weather has been fantastic!  For the past few days, highs have been in the mid-60s, and they expect mid-70s in the coming week!  Because of the great weather (and the late sunsets), we have been spending time cleaning up the garden and getting ready for the coming summer.  We pruned the blackberries and raspberries to 30 inches high, cutting just above last year's buds.  We also trimmed back the perennial plants (strawberries, chives, and asparagus), pulled some weeds, raked leaves, and generally cleaned up the area.

Last year, a friend from church gave us some rhubarb root, which we planted by the asparagus.  Rhubarb propagates via a rhizome, like ginger and many flowers (think Day Lilies) and grasses.  To transplant it, you simply cut off a piece of the root and re-plant it.  We didn't realize how fast the rhubarb would grow (we don't grow rhubarb in Texas), so we placed it in a poor spot.  I needs about four feet of room for a single rhubarb plant, so we moved it to a bed with more space.  The rhubarb rhizome is shown to the right, and is about a foot in diameter and eight inches high.  When we planted it last year, it was about a fourth of that size!

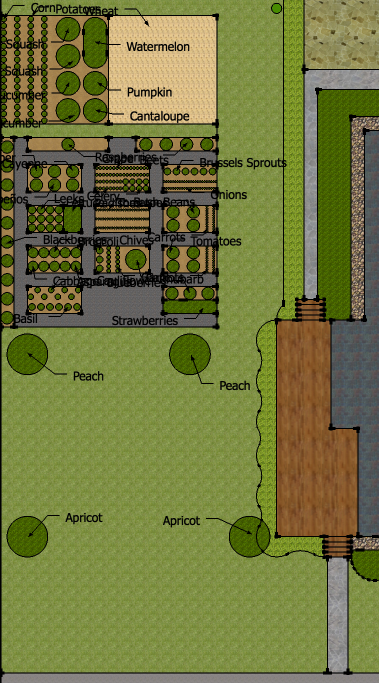
We have finally completed our plan for the garden layout this year.  We added some new plants and extended the garden a bit.  A drawing of the layout of the garden area is shown to the left.  The wheat field is located in the upper-right corner of the garden, and there was originally a plan for a second field to the left of that.  Instead, we decided to plant vegetables there, and possibly extend the wheat further upward in the future.  In the center of the drawing is the main garden area, which I will show in more detail below.

Last year we also planted two dwarf peach trees, one above the blackberries and one below.  The one that was planted above the blackberries died, so the only existing fruit tree is the one below the blackberries (at the center-left of the drawing).  This year, we are going to plant a second peach tree to the right of the drawing nearer the house, as well as two dwarf apricot trees, as shown at the bottom of the drawing.  All of these trees will grow to only between 12 and 15 feet in height, but will produce full-sized fruit in a few years.  We buy our trees bare-root from Miller Nurseries.  They are located in the Finger Lakes region, and have lots of tree varieties that are well-suited to our climate.

First I'll talk about the plants we are growing next to the wheat, then I will go over the main garden.  The main garden is built of raised beds, about six inches in height, but the back portion of the garden is at ground level.  A drawing of that part of the garden is show below.  The wheat field is on the right.  It is a 16-foot square, and is planted with hard red winter wheat, which we will use for making bread.  We planted the wheat in the fall, and it is about three inches high now. 


Along the fence at the far-left of the drawing we will have two rows of corn, followed by two rows of potatoes.  These rows are all two feet wide.  Then, we have two four-foot rows of vine plants, including pickling cucumbers, summer and winter squash, cantaloupe, pumpkin, and watermelon.  These vine plants all need rows four feet in width, and the watermelon needs between six and eight feet of row for one plant!

Below is the drawing of the main garden for this year.  The garden is 28 feet long (height on the screen) and 32 feet wide.  The blackberries are to the left of the drawing, the grape vine is at the top-left, and the raspberries are at the top-right.  There are other perennials scattered through the garden, but most are annuals that we can (and should!) change from year to year.  There are many resources for guidelines on rotating vegetables, and some can be seen in the Amazon gadget on the right side of the blog.


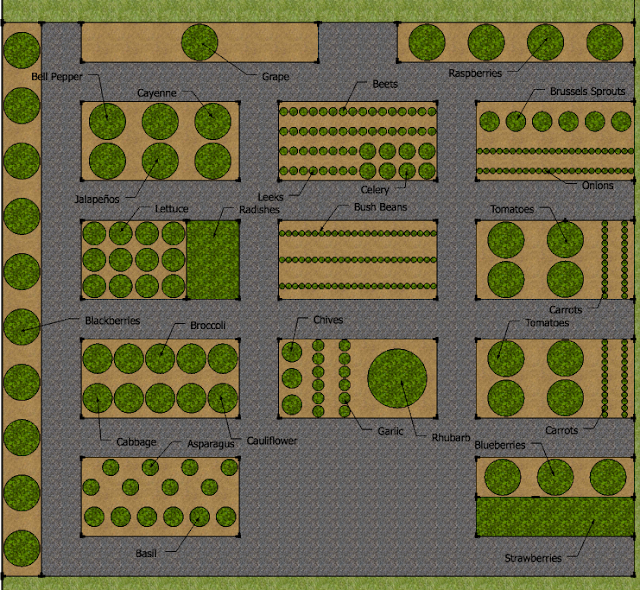
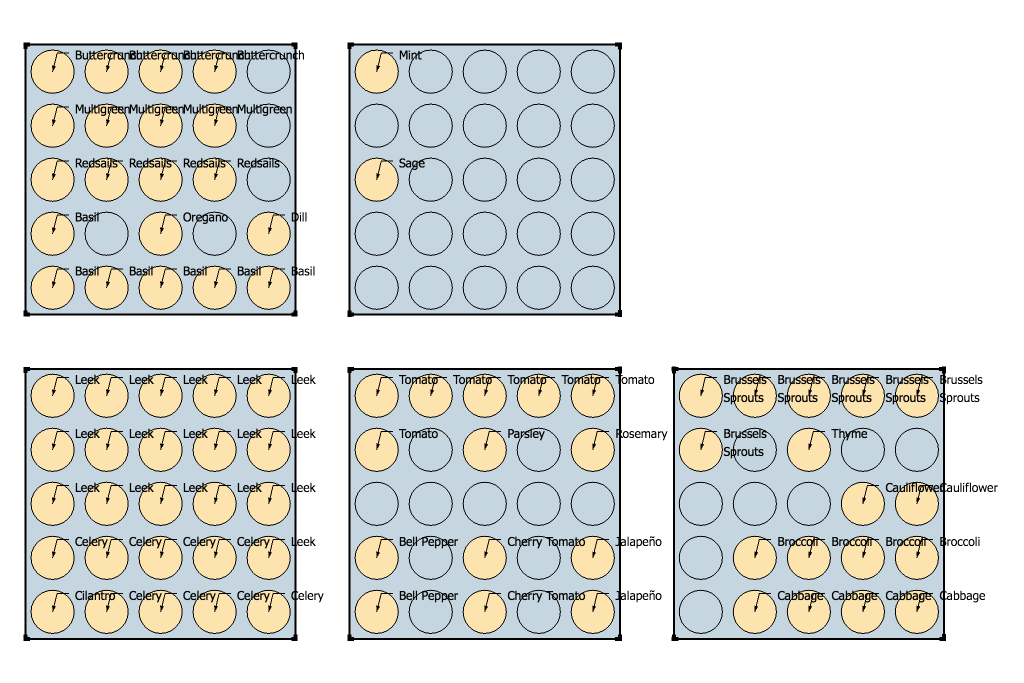
I will start in the top-left bed and move to the right and down the drawing.  First, we have our pepper plants.  Last year, we planted four bell peppers and two jalapenos, but we decided to only do two bell peppers this year.  A friend from work also gave us two heirloom seedlings from a pepper plant her father planted years ago.  We originally thought they were Anaheim peppers, but once they grew we assumed they were cayenne.  We have since learned that they are in fact Chile de árbol peppers, which are about as hot as cayenne, and are usually dried and ground and used as a seasoning, just as cayenne peppers are.  We will plant two of those plants in that bed as well.

The next bed will be for beets, leeks, and celery, which are all new for us.  Celery is infamously the most difficult garden vegetable to grow.  Most gardeners recommend just buying it from the grocery store instead of trying to grow it yourself, but they also recommend trying to grow it for fun, so we will try.  The final bed on the top row will be for Brussels sprouts, which are new for us as well, and onions, which are not new.

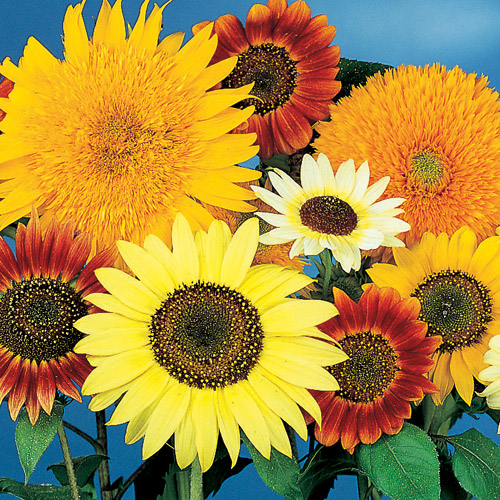
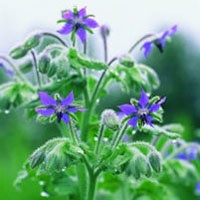
On the next row, we will plant lettuce and radishes in the first bed.  Lettuce grows rather quickly, but doesn't store well, so we will start these seeds about two weeks before last frost, and plant new seeds every week afterward.  That way, we will have a couple heads of fresh lettuce throughout the summer.  Next we have bush beans, which are susceptible to frost and can't be planted until a couple weeks into June!  Finally, tomatoes and carrots.  This year we will plant two cherry tomatoes, two beefsteaks, and four heirlooms.  We hope to have enough to can (if we don't eat them all fresh!), and we plan on interspersing the plants with borage, a flower/herb that repels hornworms.

Tomato hornworm
The next row will have cabbage, broccoli, and cauliflower (all new) in the first bed.  The middle bed is perennial, and includes chives and garlic, as well as the large rhubarb plant.  Garlic is traditionally planted in the fall, but can also be planted in the spring, which is when we will plant ours.  The bottom row is also mostly perennial, but we will plant basil in the asparagus bed (we usually pant basil with tomatoes, but it pairs well with asparagus as well).  The last bed contains strawberries and blueberries.

That's all for this week.  Next week we hope to have cilantro, celery, and leek seedlings, and we will plant lots of new seeds, including peppers, tomatoes, some herbs, and more!  I will also talk about companion flowers!

Sunday, March 11, 2012

Starting Seeds

This is the first week for starting seeds!  In the video below, I show the seed starting equipment I use, including peat pellets, trays, a heating mat, and grow lights.  I use Jiffy pellets, which are available from any hardware store or nursery.  Just add water to expand the pellets, plant the seeds, and cover with the lid to keep warm and moist.  You can re-use the trays from year to year (clean them with water and bleach to sterilize before reusing), and you can by new pellets separately in bulk for around 10¢ per pellet!

The heating mat and thermostat are from Hydrofarm, and the grow lights, stand, and timer were purchased from BuyPlantLights.com several years ago.  The heating mat measures four-foot by two-foot, and we have it sitting on a six-foot folding table.  The light stand is a little over four feet long, and has four fluorescent bulbs. The bulbs are made by Verilux, and have a spectrum that's pretty close to that of the sun (at least the plants can't tell the difference).  I'm sure there are more expensive and higher-quality options out there, but these have served us well for several years.  We keep the heating mat thermostat set at 80°F.

The other equipment we use include a space heater and a box fan.  Young plants need a lot of air to grow, and if the air becomes stale, fungus will form and kill the seedlings.  We also heat with wood, and the room the plants are in doesn't get much heat from the stove, but it probably the naturally warmest room in the house.  So we use a space heater (with a thermostat) to keep the air temperature above 60°F, and once the plants are under the light, we use a box fan indirectly to keep the air in the room moving.  We have at times in the past also used a room humidifier when the air got too dry (like after a few cold, clear days).  We keep an indoor thermometer/hygrometer near the seedlings to monitor the temperature and the humidity in the room.

I will post the garden layout next week, but it is pretty much finalized now.  New vegetables this year include broccoli, cabbage, cauliflower, Brussels sprouts, beets, radishes, leeks, celery, garlic (in the fall), squash, corn, melons, and pumpkins.  Other new plants this year include several herbs (which will be in 12-inch pots), some flowers (both amongst the vegetables and in pots), and a second peach tree and two apricot trees.  This sounds like a lot of new stuff, but really isn't that many more plants, just more variety from last year.  The biggest change will be putting the corn, potatoes, and vine plants in the back of the garden with the wheat so they have more room to sprawl.  Also, we will have flowers scattered about for companion purposes (I will talk more about this in a future post).

Many of the plants this year need to be started indoors (we only have about a 140-day growing season), but a few (like corn and beans) must be sowed outdoors.  We have created a table of plant spacing and sowing information for our plants, as well as harvest date estimates.  The table is shown below.  The flowers are not included because they are all sown outdoors after the last frost (May 25).


Most of the columns in the table are self-explanatory.  The "Number" column is the number of plants we are planing this year, the "Plant Time" column is the date that I need to plant the seeds (which is the last frost date minus the number of weeks in the "Start (weeks)" column times seven days per week).  The "Indoors?" column says whether those seeds are started indoors, and if so the "Peat?" column says whether the seeds are started in peat pots.  The "Transplant?" column says when the plants should be transplanted (not hardened) if they are transplanted before the last frost date.  The "Germination" and "Maturity" columns are the number of days to germination and maturity of the plant, respectively, and the "Harvest" date is the start date plus the germination time plus the time to maturity.  (Some plants don't have a germination time because they are planted from transplants, and some don't have a time to maturity because they are continually harvested, like herbs.)

For anyone who is interested, the seeding tray layout chart I show in the video is below (kinda boring though):


This week's video is below.  In it I walk through the seed starting equipment, show a time-lapse of the pellets absorbing water (really took about 30 minutes), and show how I plant the seeds (tweezers are a must!).  Please take a look.  Next week there won't be much action (the early seeds take a long time to germinate), but I will talk about the layout of this year's garden in contrast to last year's, and lessons learned from last year.


Tuesday, March 6, 2012

First Steps for 2012

Welcome to the 2012 Gardening Season!  I started this blog last year, and did a really poor job of keeping it up-to-date.  I plan to do much better this year!  A few weeks ago, I stumbled across my "old" (circa-2005) camcorder in a box in the attic, so I decided to clean it up and use it in this blog.  I plan to post updates weekly, so please hold me to it!

Ashley and I have been planning our garden layout for the past few weeks.  We plan to increase both the numbers and the varieties of vegetables (and fruits!).  This will include squash, corn, cabbage, broccoli, cauliflower, apricots, and other plants.  I will cover our plan for 2012 over the next few weeks.

The first step for this year is to build trellises and prune the brambles (blackberries and raspberries) and the grape vine.  The brambles will be pruned to 30" high, and the grapes will be pruned to only 3"!  This will allow the grape to select its own trunk over the five-year pruning and training plan before it actually produces fruit.  The blackberries will eventually grow to about six feet high, and they need to be trained into a "wall" of bushes.  Likewise, the raspberries will grow to about three feet high and need to be trained into a short hedge.  Both of these require wire trellises to facilitate the training.  So, this weekend we built the wire trellises for all three plants.  We had to dig post holes to do this, so we want to dig the holes while the roots are still dormant (damaging the roots will kill the plant immediately).  We also want to prune the plants while they are dormant to minimize the stress.

For the blackberries and the grapes, the trellises have to be six feet tall.  We used 4×4 treated posts, nine feet in length, and buried them three feet deep.  The wire we used was 12.5-gauge steel vine wire commonly used in vineyards.  We put about 200 pounds of tension on the wire by pulling it through wire vises with a pry bar.  We bought the wire and the vises from Orchard Valley Supply.  For the blackberries, we ran wire at heights of 2.5', 3.5', 4.5', and 5.5' above ground level.  For the grapes, we ran wire at 3.5' and 6' above ground level.

For the raspberries, the trellises have to be three feet tall.  My rule-of-thumb for posts has always been to bury one-third of the total height of the post (or one-half of the above-ground height).  So, for the raspberries, that would mean a post 4.5' long, with 1.5' buried and 3' above the ground.  This works fine for posts without a force on it, but it didn't work well when I applied tension to the wires.  The force pulled the short posts when only buried to 1.5'.  To fix this, we will need to dig the holes down to 3' depth, and place 6' posts in the holes.  We will do this later in the week (when highs are forecast to be in the 60's!).  Since raspberries spread out much more when they grow than blackberries do, they require two wires at about three feet high, spaced about a foot apart (so a tee-shaped post).

Setting these posts and wires were the tasks for this past weekend.  My attempt at a video is posted below, and it shows the "before" and "after" status of the trellising.  Next weekend, we will setup our seed starting equipment and start the first seeds!